![]()
![]()
|
Setting up a Standard PC |
|
Setting up a Laptop |
Setting up a standard PC |
 |
Once you have a PC (Personal Computer) or laptop and have just got it home,what's next? If you have a PC first you will have to connect up all the components. You may have been supplied with:
You may have also been supplied with a printer or a scanner or a camera or some other component as part of a package deal. One way or another all these parts must be connected together so that the computer has access to all it's devices.
 The first thing to do is connect all the devices to the correct
port at the rear (or sometimes the front) of the Base Unit. Computer Base
Units can be of different types and sometimes have different sockets.The
socket and plug of each component should match,if they don't,sometimes it
is possible to get an adaptor to change one plug into
another type. Be careful though,because the computer sometimes does not allow
certain devices into certain sockets. A case where this might happen is with
Serial and PS2 type Mice. Mice can be supplied with 9 way D connectors or
small DIN connectors if they are PS2.Very rarely you may encounter large
DIN plugs for keyboards.Mostly though there will be two small round DIN sockets
for both the keyboard and mouse,which are likely to be colour coded or marked
as "keyboard" or with a symbol or icon indicating which device connects to
that port.
The first thing to do is connect all the devices to the correct
port at the rear (or sometimes the front) of the Base Unit. Computer Base
Units can be of different types and sometimes have different sockets.The
socket and plug of each component should match,if they don't,sometimes it
is possible to get an adaptor to change one plug into
another type. Be careful though,because the computer sometimes does not allow
certain devices into certain sockets. A case where this might happen is with
Serial and PS2 type Mice. Mice can be supplied with 9 way D connectors or
small DIN connectors if they are PS2.Very rarely you may encounter large
DIN plugs for keyboards.Mostly though there will be two small round DIN sockets
for both the keyboard and mouse,which are likely to be colour coded or marked
as "keyboard" or with a symbol or icon indicating which device connects to
that port.
Take care to orientate the plugs correctly - if they are circular they may have a locating pin or bevel in the edge that indicates which way round the plug goes. For D type connectors (eg the Parallel port) the orientation is obvious since it will not go in upside down.
The printer,if there is one will connect to the parallel port or possibly the USB port.Devices such as printers may need installing using their own software which should be supplied on a CD-ROM. Scanners may have two connectors and may be "daisy chained" with the printer - that is,the scanner is connected to the PC and then the printer is connected to the scanner.
Speakers and amplifier systems connect to the sound card socket which has three or four 3.5mm jack sockets.The speaker plug should be inserted in the Speaker outlet jack.This may also be colour coded to indicate the correct connection.
 |
 |
 |
| Rear view of a PC showing cables fitted into sockets | Rear view of a PC showing sockets and cards fitted for Modem,Network and Monitor | Rear view of a PC showing PS2 and USB sockets |
If your PC comes with a Pre-installed operating system,which is likely,then
the power cable can be connected and the Base Unit switched on and if necessary
the Monitor.Some monitors are connected to the base unit via a power cable,others
connect to the mains directly themselves.
If all goes to plan,pressing the Base Unit Power on button will result in
the Autoboot process. This process is where the computer goes through a series
of setup procedures to start off some of the tasks that it will need when
it reaches the point where it starts your operating system. The operating
system will vary from PC to PC and depending on how old your PC is,but nominally
it will be running Windows XP or a 9x variant such as 95 or 98. For more
information on Windows Systems see
Microsoft's own website. During the
loading process your computer may make some beeping noises,this is completely
normal and is not an indication of failure.However,there are coded beeping
noises that the base unit will make if it fails to get through the Boot
process.If your PC fails to show the Windows operating system and has made
undue noise before it gets there,then it is either faulty or you have failed
to connect the various parts properly.
 At the front of the PC is the power switch and the controls
for the CD-ROM Unit and the entry point
for the floppy disk (if the PC has one).There
may also be a Reset switch,LED indicators (which show
hard disk operation) and possibly a 'Turbo'
button.
At the front of the PC is the power switch and the controls
for the CD-ROM Unit and the entry point
for the floppy disk (if the PC has one).There
may also be a Reset switch,LED indicators (which show
hard disk operation) and possibly a 'Turbo'
button.
The CD volume control may also be on the front facia which controls the volume of the output to the headphone socket on the front of the PC.
If all goes well the PC should boot up and reach the operating system screen after passing though the Windows LOGO screen
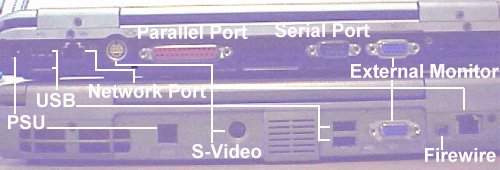 |
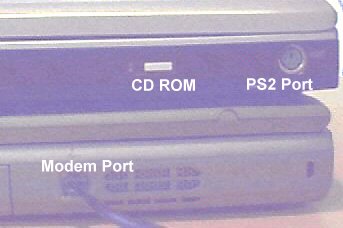
For the purposes of comparison,the pictures show two laptops showing the varied layout of the connectors on a laptop.Note that the provision of the various connectors is pretty much the same but that in some cases connectors will be omitted or extra ones may exist that may not be standard. In these examples both machines are fitted with S-video,External Monitor,PSU,USB,Network port and External Monitor connectors and both have external microphone and earphone connectors. Only one has a parallel and serial port and a PS2 Mouse connector and only one has a Firewire connector.
The connectors fulfill the following functions:
 |
 |
 Laptops are likely to have Windows XP already installed.If there
is no operating system installed then this will need to be done first.If
it is already installed,then the laptop should run from the moment it is
plugged in and switched on. There is minimal connection of devices since
most of the normal external connections made on a PC are made internally
on a laptop. In particular,the mouse may have been replaced by a touchpad,which
is operated by moving one finger around and then clicking on one of the two
buttons next to it. Sometimes the buttons are replaced by tapping the touchpad.
Occasionally one may wish to connect a mouse or other pointing device,in
which case the USB port or PS2 port (if there is one) is the connection of
choice.
Laptops are likely to have Windows XP already installed.If there
is no operating system installed then this will need to be done first.If
it is already installed,then the laptop should run from the moment it is
plugged in and switched on. There is minimal connection of devices since
most of the normal external connections made on a PC are made internally
on a laptop. In particular,the mouse may have been replaced by a touchpad,which
is operated by moving one finger around and then clicking on one of the two
buttons next to it. Sometimes the buttons are replaced by tapping the touchpad.
Occasionally one may wish to connect a mouse or other pointing device,in
which case the USB port or PS2 port (if there is one) is the connection of
choice.
In the event that the wrong connector is on the device you wish to attach then it maybe possible to use an adaptor to alter the plug at the end of the device,however it is not wise to do this indiscriminately and without any knowledge of the device and the type of data it produces.Consult someone who knows what they are doing before altering device connectors in this way.
 If the laptop has a parallel port then printers can be attached
there,but the odds are that you will need a USB compatible printer or scanner.If
more devices are to be connected then you may need a USB hub
which increase the number of ports available.
If the laptop has a parallel port then printers can be attached
there,but the odds are that you will need a USB compatible printer or scanner.If
more devices are to be connected then you may need a USB hub
which increase the number of ports available.
In both cases,if your PC or laptop reaches the operating system stage and the Windows Environment is up and running then it is worth checking the device list in the device manager to see if all devices are available and functioning.Windows may well find some of the devices itself if they have either recently been installed or it has knowledge of them,it may attempt to install them itself. The device list can be found in the CONTROL PANEL section under "System - Hardware tab - Device Manager" for Windows XP.
If a device is failing or not functioning properly then Windows will indicate this with a yellow question mark against the device in question. To correct such failures may require the help of a computer engineer if you do not know what you are doing.
Points to remember about Setting up a PC:
Glossary |
|
| USB Hub | A device for extending your PC's ability to have attached serial devices. |
|
Further Glossaries |
|
Learning Computer-ese |
|
Jargon Buster |
|
Hacker Jargon |