 Scanning an image from a device
For the purposes of working with images,the computer needs some sort of input
device connected to it,usually a scanner or a camera.Pictures can be downloaded
from the internet,but here we are concerned with images that have been created
from an external device. For the purposes of comparison there will be two
paint programs shown here,as MSPaint which is in WINDOWS is relatively
unsophisticated and may not be able to do some of the things more sophisticated
programs can do.
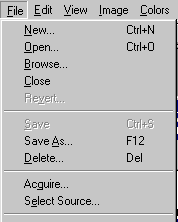
Generally speaking though,images are accessed via a scanner or camera using
"Acquire" which is usually found on the FILE menu along with SELECT SOURCE.
Scanning an image from a device
The Select Source is required if you have several devices installed on your system. All scanners and cameras usually have a CD with installation software which needs to be installed first BEFORE the paint program can access the device. If the device is a USB device,sometimes this is not necessary and the pictures maybe accessed almost as if the camera is another disk unit attached to your system.
If your camera or scanner says it is a TWAIN (Technology Without An Interesting Name) device then it conforms to an industry standard and may use an extra piece of software to access pictures peculiar to itself and not the paint program. The following is taken from the PAINT SHOP PRO 3.0 help file.
| Using a
TWAIN-Compliant Device
(Scanner)
Paint Shop Pro supports
TWAIN-compliant image
devices, such as scanners. TWAIN is an industry standard that allows applications
(like Paint Shop Pro) to talk to the software that controls an image device.
|
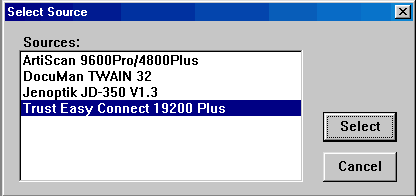
PAINTSHOP PRO's SELECT SOURCE DIALOGUE
When you have selected the correct source,use ACQUIRE from the FILE menu to start the TWAIN software if this is how your device works,from that point it is a matter of following the procedures specified by the device manufacturer,hopefully the image will end up in your Paint program.
Note also that using the PRINT SCREEN key on your keyboard will transfer the contents of the desktop as an image into the copy buffer and therefore an image can be pasted to a paint program directly from the desktop.Some programs have a CAPTURE system which allows picking up images from WINDOWS for use in documents and in fact that is how the images in this document were created.
If your device does not use TWAIN then the device may show up in the Windows Explorer system or MY COMPUTER as a device,in this case photos can be cut and pasted from the device rather as one would a CD or floppy drive,then it is a matter of opening the picture into a Paint program from the folder on your computer.
File Formats
Some scanner and cameras work by using their own independent software.If this is the case then operate the program that came with the camera or scanner and obtain the image,then save it to disk. Note that the file format that you save in has different properties - for instance .gif can only have 256 colours as a maximum, .bmp files use large amounts of disk space and .jpg files are corruptible or "lossy" which means the more times you open them up - the less the quality or integrity of the image is maintained,that is - they degrade with time,whereas .gif and .bmp do not.
Note that image FORMATS are extremely important - these days there are several algorithms for storing images. .jpg is an example of a compressed file format,.bmp and .gif are pixel formats, .art files which are sometimes found online are a type of fractally compressed format and there are also Word META formats that use vector methods of storing images. If you have used the image files in WORD you will see that they are more like cartoon drawings and not photographs. For photographic images it is usually best to use .jpg if they are large images as this makes a small file size,use .bmp if you wish to keep the integrity of the image and are not sending it over the internet.If the image is to be put on a webpage then use .gif.
Once the image is inside the Paint program it can be manipulated using any of the tools in the paint program and then resaved to disk. Note also that most paint programs can convert one file format to another,and so you may have scanned the image as a BMP or taken a photo as a JPG but what format the image is saved on the hard drive is up to the paint program to decide after it has been manipulated or edited.
 Editing an Image
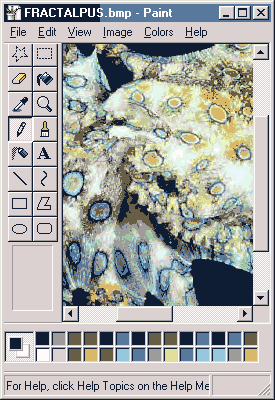
Editing is done slightly differently in different programs. In MSPaint there is a toolbox to the left and a colour palette at the bottom of the screen showing the foreground and background colours off to the left.
On each paint program it is worth reading the HELP file obtained by clicking on the help menu,this will detail any functionality the program has and how to exploit it.
After editing,the image can be cut and pasted into any other program,such as WORD or your Email.When doing this take note of the number of colours and size of the image as this will affect the size of the WORD file that you create. The PROPERTIES of the image will indicate it's size. In MSPaint this is under the ATTRIBUTES section of the IMAGE menu. In other programs,the same information may appear under the FILE menu as PROPERTIES. In Paintshop Pro 3 for instance the information appears as an option in the top left hand corner drop down menu of each image and offers the following information.
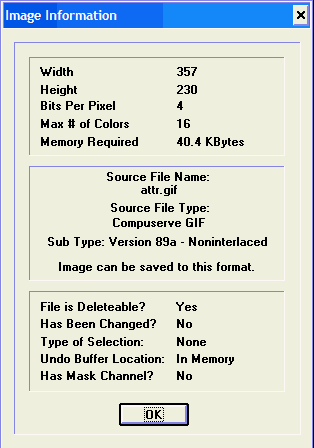
Note the different information and options on the screens from both programs. The MSPaint information gives the width and height in pixels,so does the Paintshop screen.Both show the memory required to store the image,one shows it measured in bytes, the other in Kilobytes. The MSPaint screen shows the resolution of the image,Paintshop shows the colour depth and therefore how many colours the image can contain. It is worth taking note of this sort of information,as one can easily balloon WORD files with large images or use up disk space or FTP webspace by not taking care of how big image files are. In general,grey scale images need only about 16 shades to handle a fair image,whereas colour ones need at least 256 to give a good likeness. .JPG images,because they use file compression, can create large images with more than 256 colours and still use a small file space. Note that there are also other considerations for images - such as whether portions of them are to be transparent to the background or whether they are animated,in which case this may need a file SUB-TYPE.Note the Image information from Paintshop indicating the file is .gif Sub-Type 89a- Noninterlaced - this property allows the capacity for making one colour transparent and thus one is able to view whatever background is behind that image at the point that the colour in question arises in the image.
Once you have a file format that suits your image,you can store it on disk or Email it or add it to your written document using cut and paste,or insert it as an image from file in WORD.The program that you insert the image into may allow further editing of the image,such as formatting its size or relationship to surrounding text. It is therefore,worth reading the HELP documentation of whatever program you are inserting the image into,to find out how it deals with images.
Printing
Note that when printing an
image it may need scaling to the size of the paper and how to do this varies
from program to program. In general,a small picture will become pixellated
and lose resolution if it is printed enlarged. Some programs will give you
a print preview so that you can see what the picture looks like on paper
before it is printed. Often the picture can be enlarged or reduced and placed
on the paper at a given position or centered on the page. It may also be
the case that the aspect ratio can be changed so that the picture will fill
the paper. The options for printing are likely to be found on the FILE menu.
Points to remember about Paint:
See Also Problem Solving (Q&A), Copy and Pasting [DOC],Inserting a Picture [DOC]
